Thanks for checking on the progress of the crew cab project, however, all efforts are into getting the Ramcharger on the road this summer to enjoy the open air. Here is a vid and link to my ramcharger site.
www.cumminsramcharger.blogspot.com
Monday, June 16, 2008
Monday, June 2, 2008
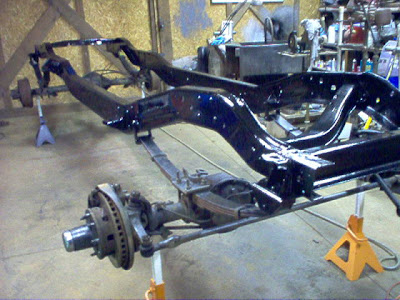
Front Axle
Not much new going on with the crewcab these days. All efforts are going into the Cummins Ramcharger. The link is on this page. You should check it out, if you haven't. Anyway, in a three axle swap with the ramchrger, 5-speed donor truck, and the crewcab, I ended up with the dually front d60 in the crew frame. the d44 from the crew is now in the Ramcharger with the lift springs. It will eventually be replaced by the d60 that M & H are welding.
 Still can't get used to the idea of the crewcab becoming a dually. We'll see.

 Still can't get used to the idea of the crewcab becoming a dually. We'll see.
Monday, May 12, 2008
Time to put the cross-members back in.
I wanted the frame to be flat and square before I bolted it back together. First I put a level on the back. It showed about 1/4 inch low on the right.
 To adjust I stacked washers under the rigt rear jack stand.
 The level on the front showed that it was about 1/4 in low on the left. This meant the frame had 1/4 inch of twist in it. I do not know if the cross-members will hold it flat, but it gives me a good starting point.
 Once again, I stacked washers under the appropriate stand. Before bolting in the members, I put a tape accross the diagonals in three different places. All showed that the frame was square. Now that I know that the frame is square and flat, it is time to bolt it all up.
 Here it is from front to back with the members on place and torqued down to 60 ft/lbs on the 7/16 bolts and 80 ft/lbs on the half inch bolts.
 The last pic from back to front. I don't know why it is green. I think it will signal the end of the cheap camera. I will likely need to move the two middle cross members forward some because the NV4500 5-speed is shorter than the auto that was on the 440.
The next move will be to roll it out of the shop and start in on the Ramcharger.
Saturday, May 10, 2008
Finally got some paint on the frame.
Sorry for the poor picture. Using an old cam as a shop cam. Anyway, here is the painted frame. I coated it with POR15. This is two coats of the original product. Tomorrow, I will recoat it with POR15 Chasis Black. Unfortunately, it looks like my hands and arms will be blackish for a while. POR15 does not wash off skin. Next time I will wear long sleeves and keep my gloves on.
 A better picture. I did not paint the axles. They are not staying on the truck.
 The next step after topcoat is to pop some wheels on it and roll it out of the shop to make room for the Ramcharger. I want to do a quick cummins install and get it on the road. Then I can get it out and have room and time for the crewcab again. So, It looks like I will be signing off this blog for a while and focussing on the Ramcharger blog. Check the link.
Cab Mounts
I have 3 different Dodge trucks without bodies on them and all of them have cracked or broken rear cab mounts. I figure if I just weld them up they will just crack again, so I looked at a different remedy.
 I searched through my washer box abd came up with two large thick washes to weld in place to reinforce the entire mount surface.
 Clamped up ready to weld.
 Yeah, I welded it right above the fuel tank. Maybe I am not too bright

 I searched through my washer box abd came up with two large thick washes to weld in place to reinforce the entire mount surface.
 Clamped up ready to weld.
 Yeah, I welded it right above the fuel tank. Maybe I am not too bright
Tuesday, April 29, 2008
Started Cummins Ramcharger Blog
Sorry for the lack of progress. Things will change soon. I added a link to my new Ramcharger swap page. I plan to knock out a quick swap, nothing fancy, to get this on the road. I can't wait to roar down the road with the top off. In the picture below, I figure if I fit, that little 6 cylinder cummins wil drop right in. I can't even remember what I was doing in there. What a dork.
 Check out the link in the right column.
 Check out the link in the right column.
Thursday, April 10, 2008
A new donor
I have been toiling over the decision of whether to buy a new 5-spd NV4500 transmission or to put the truck together with the original 1992 4 speed automatic. The issue of my personal preferance was made a long time ago. I really wanted this truck to have the stick, and I wanted the NV4500 instead of the frequently weak link Getrag. The problem was the cost. The new tranny would be the single most expensive part of the whole project. Then, I was turned on to a local wrecked w350 dually chasis that had a 2 year-old NV4500 in it. The whole 1st generation package - clutch, bell housing, starter, etc. The beauty of the deal is that this chasis came with a 1993 cummins 6bt engine, an NP205 transfer case, Dana 60 dually front axle w/3.54 gears, and a dana 70 dually rear w/3.54 gears and a limited slip. All this for $300 more than the new tranny would have cost from the supplier. I could not pass it up.
Here is the engine.
 And the tranny.
 And the rear-end under a twisted pile of metal.
 Now the little ramcharger gets to be a cummins too. (Smillin' big)
Here is the engine.
 And the tranny.
 And the rear-end under a twisted pile of metal.
 Now the little ramcharger gets to be a cummins too. (Smillin' big)
Sunday, April 6, 2008
Project may be taking a turn.
Sometimes the unexpected happens. Even though I have not put in much work on the truck lately, I have not been Idle. I am now in the process of buying a '93 4x4 cummins dually 5-spd donor. The 5-speed is the desirable NV4500, not the getrag. Assuming this happens, I now have two complete power trains. One auto, one 5-spd. This can only mean three things:
1. The crew cab may become a dually.
2. The ramcharger gets a cummins.
3. The 44o is now for sale.
So boys and girls, tune in next week to see what happens next.
1. The crew cab may become a dually.
2. The ramcharger gets a cummins.
3. The 44o is now for sale.
So boys and girls, tune in next week to see what happens next.
Sunday, March 30, 2008
Busy making fuel.
Truck has been sitting idle for most of the week. I thought I would blaze on it as I have had this week off. I bought some POR15 to paint the frame. Then I remembered the broken cab mount.
I was going to weld this today. I hooked up my new bottle of gas to the wire feed, only to find it empty. They either sold me an empty bottle or one that leaks. Anyway, I didn't want to put the flux core wire back in so I had to wait.
I have spent some time trying to pick-up waste vegetable oil accounts and making fuel. Now the week is toast and I am back to work tomorrow. Hopefully I can get some shop time in during the coming weeks. I would like to make more progress.
Saturday, March 22, 2008
More cross-member work.
I went back to the wrecking yard today with a couple of wrenches and a cordless sawzall. The other day I got a 40 gallon fuel tank out of a '93 Ramcharger. When I got it back to the truck, I found that the rearmost crossmember on the pick-up frames is designed differently than on the Ramchargers, and it would have to be changed if I wanted to install the tank up out of the way as much as possible. So, I went back to the same ramcharger to cut the frame off behind the rear shock mount. Below is the section of the frame as it looked when I got it home. You can see that there are three crossmembers instead of one. The front (right) and back (left) fit the contours of the front and back top of the tank, and the center is flat with the top of the frame to allow the tank to sit up at least 2 inches higher than it could with the pick-up frame member.
 Here is a picture of the tank up tight against the original crewcab frame. The arch in the member is shaped just right, but the tank sits down 2 inches lower than it could, and I would need to fabricate hangers to support it.
 Of course this thing is riveted in, as are all three on the other hunk of frame. I think I ground and chiseled and drifted eighteen rivets today.
 This crossmember is set between the rear spring hangers, which maces ir structurally crucial. That is why the Ramcharger frames have the two heavy members that tie the top and bottom of the frame together and keep the rails from twisting. For those of you that are wondering what I am going to do for a spare tire, I am wondering that, too. In all the years and miles that this truck and I have been through, I have never had the bracketry to hang a tire under the bed anyway. I just left it in the bed or left it at home. I know I am due, but in 28 years of driving, I have never had a flat on the road. Yeah, I am looking for some wood to knock on.
 Here are the three new and dirty pieces clamped in place. The middle one actually goes under the rail. I just laid it there for the pic. I mounted the ront and back members before taking out the original to mak sure that the frame did not change shape on me.
 The front and back are bolted in . Because of the size of the rivets, I used half inch hardware on most of this. I wanted the bolts to fit tight in the holes to lessen the chance of things moving around.
Now to grind out, hopefully, the last rivets of the project.

Here is the tank held in place with the floor jack. You can see the '92 diesel fuel pickup and guage sending unit I got thanks to Thomas, AKA Alwaysworking on the DTR site.

This is what it looks like looking back over the top of the axle. The little plate on front holds the full skidplate that I found when I went back to the wrecking yard today.
 You can see why I wanted to get this thing up as far as possible. It does hang down a might. By the time I get my trailer hitch back on and the monster bumper that is hanging out on my daughter's Ramcharger, I don't think you would ever see it though.

 Here is a picture of the tank up tight against the original crewcab frame. The arch in the member is shaped just right, but the tank sits down 2 inches lower than it could, and I would need to fabricate hangers to support it.
 Of course this thing is riveted in, as are all three on the other hunk of frame. I think I ground and chiseled and drifted eighteen rivets today.
 This crossmember is set between the rear spring hangers, which maces ir structurally crucial. That is why the Ramcharger frames have the two heavy members that tie the top and bottom of the frame together and keep the rails from twisting. For those of you that are wondering what I am going to do for a spare tire, I am wondering that, too. In all the years and miles that this truck and I have been through, I have never had the bracketry to hang a tire under the bed anyway. I just left it in the bed or left it at home. I know I am due, but in 28 years of driving, I have never had a flat on the road. Yeah, I am looking for some wood to knock on.
 Here are the three new and dirty pieces clamped in place. The middle one actually goes under the rail. I just laid it there for the pic. I mounted the ront and back members before taking out the original to mak sure that the frame did not change shape on me.
 The front and back are bolted in . Because of the size of the rivets, I used half inch hardware on most of this. I wanted the bolts to fit tight in the holes to lessen the chance of things moving around.
Now to grind out, hopefully, the last rivets of the project.
Here is the tank held in place with the floor jack. You can see the '92 diesel fuel pickup and guage sending unit I got thanks to Thomas, AKA Alwaysworking on the DTR site.
This is what it looks like looking back over the top of the axle. The little plate on front holds the full skidplate that I found when I went back to the wrecking yard today.
You can see why I wanted to get this thing up as far as possible. It does hang down a might. By the time I get my trailer hitch back on and the monster bumper that is hanging out on my daughter's Ramcharger, I don't think you would ever see it though.
Thursday, March 20, 2008
Side Note
I got my biodiesel eqipment today. looks like friday I will be making fuel. I don't have any pictures yet, but I got a fuel tank out of a ramcharger to put in the frame behind the rear axle. This tank holds 40 gallons. Together with the large stock diesel tank, I will be able to hold close to 75 gallons of fuel. At 20 mpg on the highway, that will get me 1500 miles round trip. I need to go back to the wrecking yard and get the cross members out of the back of the ramcharger. Then, I need to replace one of my few remaining cross members with two from the ramcharger. This will allow the tank to sit up as high as possible under the bed and allow me to use the factory straps. Looks like I get to grind some more rivets.
Dead Internet
Internet has been dead for a few days. Satellite people came today, and I'm up again. I will get some work done on the truck this comming week. No Work! Yipeeeee!
Sunday, March 16, 2008
Getting ready to paint the frame.
I rolled the frame outside today and hosed it down with degreaser the pressure washed it again. You can see that I took out the new cross member and also removed the carrier bearing cross member that was in the way of the front of the fuel tank. The Tranny cross member came from the factory with bolts, so I removed it. the oil and dirt was really packed in around this area, and I wnt to get it cleaned-up for paint. I also removed the steering box. The 1977 box is different than the 1992, and I do not know which one I will be using yet. I also removed the shocks and front sway bar. Since I need to let the frame dry before I can finish the paint prep, I went to work on the front axle again. Remember, the inner-c or housing yoke on the short side was broken when my donor truck was wrecked. Previously I had ground the weld away where the C is pressed on to the axle tube, and I had beat the snot out of it with a three pound hammer, but I could not get it to budge. Today, I ground on it a little more. You can see I ground too far. I will weld it back and grind it down before I put the replacement C back on.
 I do not know if any of you have ever dealt with this type of problem before, but the press fit is tight. I heated it up with the torch to expand the ring and beat on it until my arm was ready to give out and I could not get it to budge. So I got out the port-a-band and cut most of the way through in two places, then beat on it until it broke. Below is the replacement part on top, and the broken part, now in two pieces, below.
 When I put the replacement on, I was going to clock it about 4 degrees so I could take the wedge out of my sping pack and restore the caster back to factory specs, but after this, I may have to rethink removing the other side that is not broken. I may cut the tube, clock it, and sleeve it. or I will just put the wedge back in like everybody else.
 Since I need to let the frame dry before I can finish the paint prep, I went to work on the front axle again. Remember, the inner-c or housing yoke on the short side was broken when my donor truck was wrecked. Previously I had ground the weld away where the C is pressed on to the axle tube, and I had beat the snot out of it with a three pound hammer, but I could not get it to budge. Today, I ground on it a little more. You can see I ground too far. I will weld it back and grind it down before I put the replacement C back on.
 I do not know if any of you have ever dealt with this type of problem before, but the press fit is tight. I heated it up with the torch to expand the ring and beat on it until my arm was ready to give out and I could not get it to budge. So I got out the port-a-band and cut most of the way through in two places, then beat on it until it broke. Below is the replacement part on top, and the broken part, now in two pieces, below.
 When I put the replacement on, I was going to clock it about 4 degrees so I could take the wedge out of my sping pack and restore the caster back to factory specs, but after this, I may have to rethink removing the other side that is not broken. I may cut the tube, clock it, and sleeve it. or I will just put the wedge back in like everybody else.
Wednesday, March 12, 2008
Went wrecking yard shopping yesterday.
I lined up a rear 35 or 40 gallon tank from a '93 ramcharger. If I put this in, I will be able to hold close to 7o gallons out of sight under the bed. That should get me about 1200 miles without need for a fill-up, which is pretty cool because I just ordered my biodiesel equipment. I've never had a spare tire back there, and it would be nice to stow a tire. I'll just have to decide which is better. I also found a 93 grill and valence, just in case I can't figure how to fit my old-school grill over the intercooler. I should pick this stuff up tomorrow.
Well, I haven't fallen off the planet.
I haven't been in the shop for ten days. Grrrrr. I've been sick, then I was behind on my college work. The weekend is around the corner. Yeeeee!
Sunday, March 2, 2008
Big fuel tank.
Here is the big tank sorta propped up in place under the new cross-member.
 If I don't move it, I will need to cut away half of the carrier bearing cross-member on the driver's side. This would seriously weaken the member. I think I will do some research to try to find what kind of a set-up the extended cab diesel's had. Moving the member forward is no big deal, I just want to do it right so I don't have drive line issues. My old two piece unit has smaller u-loints than either the t-case output or the dana 70 input. My donor truck is a different wheelbase and has a one piece driveline. Also, the cummins/727/overdrive/np205 is 2 inches longer than the 440/727/np203 that came out of it. Then again, if I go with the 5-speed, it'll probably be something different, yet.
 Here it the tank sitting on the member. You can see that it needs to go down several inches in the front of the tank.
Too many days on the same topic.
But then what can you expect when you can only get into the shop part of one day per week.
Here is the offending cross member. It is held to the frame rails with these three rivets on the top of the c-channel and two more below, on each side.
 On the donor frame, where I removed the replacement member, I used the cutting torch and blew the heads off. I did not want to put that much heat to my keeper frame so I took a few more minutes and ground the heads away.
 You'd think that once the head was gone a few taps with the punch would pop them out. Wrong! These babies are tight. Both ends of my drift now look like mushrooms.
 The member is out. Ready for the new(er) one.
 Here are the two cross-members side by side. The taller one (lower) will accomodate the much larger (taller) diesel fuel tank.
 This side-by-side shows the difference in depth of the two frames. On the left is the crew member out of the 7" frame. Both the top and botom fit inside the c-channel. On the right, is the '92 cummins member with the 6" frame. It mounts under the top and under the bottom of the c-channel, but the hump in the lower support makes it overall the same size at the other (lucky).
Here it is pined in place. The top holes all line-up perfectly. The bottoms will meed some massaging.
The holes were just shy of 7/16. I drilled them out to 7/16 and mounted the top with tranny crossmember bolts from the donor truck. These were also 7/16 bolts.

Here you can see what I have to deal with with the lower mounting.

The gap it exactly one inch.

So, some one inch spacers were in order. I used 1" heavy-walled square tubing.


All bolted in.

I used grade-8 bolts (overkill) and these locking nuts. Now I get to take it all back out for painting.

Thursday, February 28, 2008
Hey sorry for the lack of progress.
I had a cortisone injection in my back this week, and just have not been able to get into the shop. Will definately get in there on Saturday. Keep checking back.
Tuesday, February 26, 2008
New problem.
 The last thing I did in the shop was to remove this fuel tank and the arched cross member above it. If I am going to use this large tank in the crew cab, which I an, I will need to transfer over this raised cross member. I beat the top rivets with a cold chisel and medium hammer. I got out the hot wrench for the lower, hard to get to, rivets.
By the way, the donor frame had taken a hard hit on the end of the passenger side rail causing it to diamond or parallelogram, so I cut loose the right sde first, then put a come-a-long on it to pull it back square. I just used a framing square along the left rail to check squareness.
 So, I brought the newly free cross member into the shop and laid it next to the arched one shown in this pic. The holes for the top rivets are perfect, but the bottom holes for the gusset are wrong. This is when I found that the crew cab frame is a full inch deeper than the '92 standard cab donor. I remember this being an issue when I took the 360 out and put the 440 in. I had left the under tranny cross member on, and, since it bolts to the bottom of the frame, it put the tranny too low by an inch. Anyway, this is an imprtant cross member because it is right even with the front spring hangers. I want to get it right. I think I have come up with a way to secure this in with an inch of spacer without compromizing integrity. All this just so I can spend more at the fillin' station.
This thicker frame also pretty much means I do not change over the tranny member that I talked about in my last post for the same reason I was not able to do it ten years ago.
Subscribe to:
Posts (Atom)